
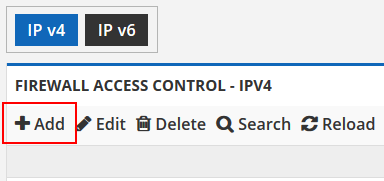
Step one is to create a group based on the destination IP. First determine if the pack you have published uses an IPv4 or IPv6 address. Then click the ADD button on the toolbar as shown below to create your first group.
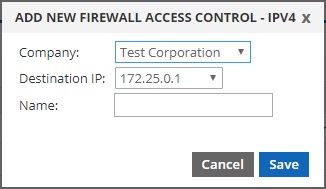
Create the group with the correct destination IP of your config/pack. Then give it a name for your own reference. We suggest using the same name as your config/pack.
Once you have created a group, expand it by clicking the black arrow icon at the left of the row, as shown below.
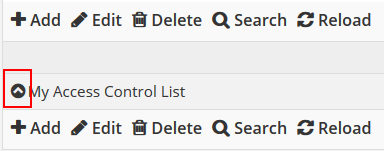
Once the row is clicked, it will reveal another table where you can begin adding your rules. Here you create the individual rules to allow or deny traffic.
Adding your first entry
To add your first entry, click the ADD button on the toolbar. That will open a dialog window as shown below.
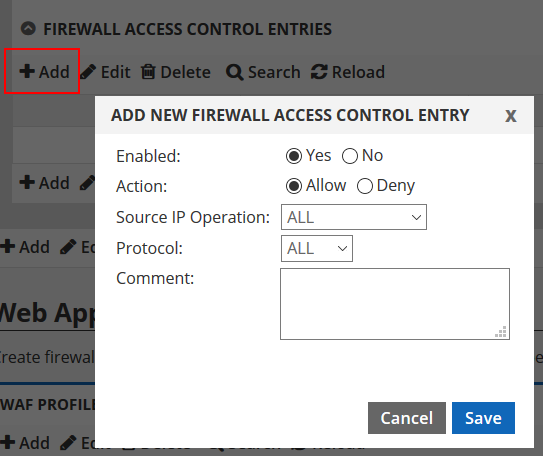
In this dialog you are presented with a number of configuration options as follows:
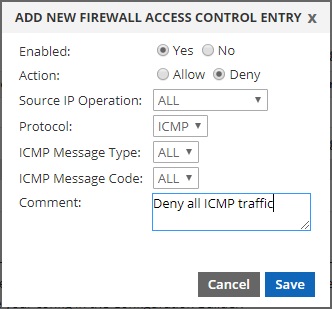
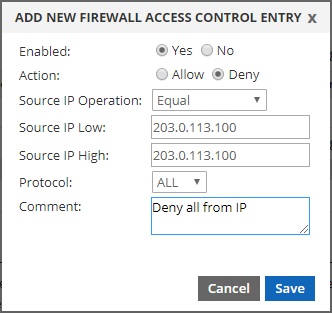
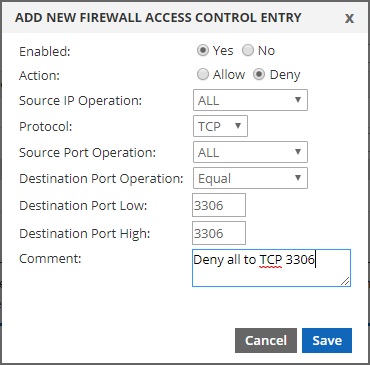
Enabled: This toggles whether the rule will be active or not. Generally when creating a rule you wish for it to be active. This is here as a convenience should you wish to temporarily remove a rule or deactivate it later without having to remove it entirely.
Action: This determines what action is taken on the firewall. Allow will let traffic through and will override a deny rule. Deny will block traffic. It does NOT override an allow rule since Deny rules are processed last.
Source IP Operation: This defaults to ALL, which means all source/origin IP addresses will be affected. The other options are “Equal” or “Does Not Equal”. If you choose either of these two options, you will be presented with text boxes to enter a Source IP Low and a Source IP High. These are simply starting and ending IP addresses. If, for example, you only want to allow or deny one IP, you would enter the same IP in both boxes indicating that the starting and ending range is the same.
Protocol: This defaults to ALL, which means all protocols. You can narrow the rule down to a specific protocol as well, including TCP, UDP and ICMP. If you choose TCP or UDP you will be given options to choose a source or destination port number. If you choose ICMP, you will be given the options to choose the ICMP Message Type and the ICMP Message Code. Hint: Ping (ICMP echo) is Type 8. Message code would be set to All.
Comment: This box allows you to add a comment to help identify the entry.
Here are some example rule configurations:
To deny ICMP to your cloud IP from all IP addresses:
To deny all traffic from a specific IP address:
To deny all traffic to TCP port 3306 from all source IP addresses:
Once you have created your first entry, you will see that it populates into the table, as shown below in our example.
To make a change to any of your entries, click on the row in the table once so it is highlighted. Then click on the EDIT button on the toolbar. This will open the same dialog you used during the create process. Now you can make modifications as needed and save your changes.
To delete an entry, simply click on it once in the table and then select the DELETE button from the toolbar. It will be removed and the platform will update in 2 minutes or less.