
Manage and create Network Packs that can be configured with DNS easily and efficiently. The aim of these configurations is to provide you with an easy way to manage your virtual configurations, while providing excellent services such as Acceleration, Load Balancing, Firewall, and Instant Failover. Below you will find a brief description of this functionality, followed by further information for each product.
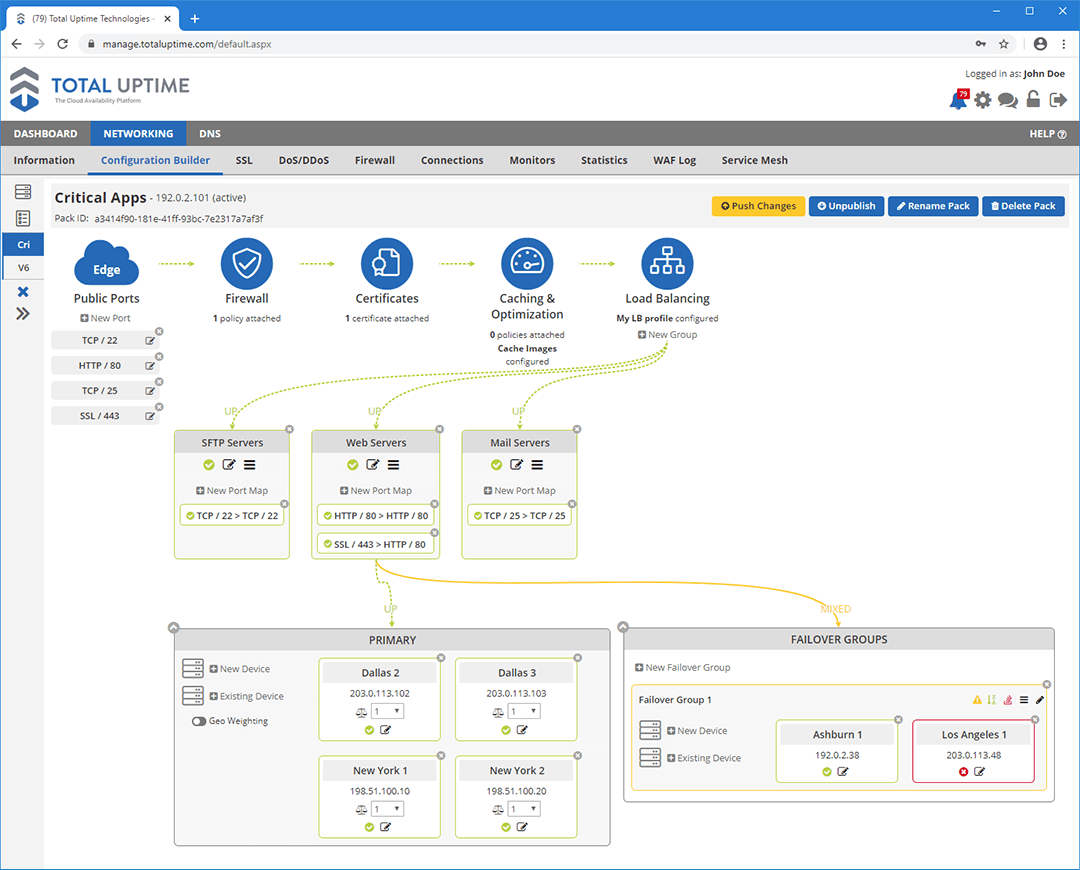
Screenshot of the Configuration Builder Canvas
Packs are made up of ‘Server Groups.’ Once added and configured a pack is not yet accessible by the public. After you have completed setup, you must choose to ‘Publish’ your Pac. Once the Pack is published it will be assigned a public IP and you can simply change your A/AAAA records in our DNS system to point at the Pack. Your website is now being routed through our system.
Server Groups are what make up a Pack. They are groups of your physical servers that are used for the same purpose. If more than one server is present in a group THEY WILL BE LOAD BALANCED. Please place servers in the necessary groups accordingly. Server Groups can also contain Failover Groups.
Failover Groups act exactly like Server Groups. They inherit all ports and product settings from their parent Server Group. You can see the list of Failover Groups when viewing the details of your Server Group.
Servers are your physical servers that are accessed by our nodes. These will be used in both Server and Failover Groups. You can find more information about servers in the ‘Servers’ section.
Port Inheritance
PACK LEVEL PORTS
A network configuration will contain 3 levels of ports: the Pack level, the Server Group level, and the Server level. Ports at the Pack level are the ports your web site/application/server will communicate to the public with. These ports are mapped to the ports on your Server Group(s). This will allow a web application running on a non-standard port (HTTP @ 336) to be mapped publicly to HTTP @ 80.
SERVER GROUP LEVEL PORTS
The ports on the Server Group level are the ports that our nodes will communicate with your servers on. Ports not specified here will be inaccessible. When a Server is added to a Server Group the Server will inherit all ports from the Group. Also any changes to ports at the Server Group level will change the inherited port for the group’s servers.
SERVER LEVEL PORTS
When a server inherits ports from its’ parent group a possible protocol conflict can arise. This issue is caused by the port already being defined on the server, but the protocol that it is associated with conflicts with the protocol the parent group is attempting to set. You will be alerted if this occurs and there are two ways of handling the issue.
1.) Manually edit the port at the Server level to match port of its’ parent Group.
2.) Manually remove the Server from the group, as it will not be able to communicate in this particular setup.
Managing Packs
- Name – The name of your new network configuration.
- Ports & Protocols – The ports on which traffic will be allowed to your Pack. These ports are accessible by the public, and must be mapped to your private Server Group ports. This mapping is done in the Server Group view.
- SSL Certificate – Attach an SSL certificate to the configuration if necessary for HTTPS traffic.
- Networking Products – Firewall, Acceleration, and Load Balancing are all accessible at the Pack level. Click the corresponding icon to manage these products. Currently settings for each product are applied to all Server Groups within a Pack.
Server/Failover Groups
- Servers – A list of servers contained in this group
- Failover Groups – A list of failover groups contained in this group.
- Port Options – Ports used to communicated with your servers are added here. As they are added they are also mapped to public ports on the Pack level. These are not defined for Failover Groups as they are inherited from the parent Server Group.
Managing Servers
SERVER PARAMETERS
- Name– This is the name of your server. It is for your reference only, and can be anything you want.
- Server IP– This is the public-facing IP address of your physical server. Our nodes will communicate exclusively with your server while accelerating, filtering, and load balancing traffic for you behind the cloud IP address. It cannot be a private IP address.
- Use client IP header– When a server is behind our network and our Cloud IP address, the original client IP is no longer visible. Instead, you will see the IP addresses of our cloud nodes. This does not affect things like Google Analytics, but will affect direct logging on your server. To remedy that, you need to pass through the client IP address. To do that, enable this feature and enter a header. The most comment header is client-ip, or x-forwarded-for. Visit this knowledge base article for more details on extracting the client IP.
- Auto-Rejoin after failover– When a server goes down, it is removed from the pool and no longer receives traffic. When it becomes available again, this feature will bring it back into the pool so it receives traffic again. If you do not want that to happen, e.g. you want to keep the server offline, simply uncheck this option.
- Alert Settings-If you would like to receive email alerts when servers go up or down, you can choose an alert list here. Alert lists are created in the ACCOUNT section of this interface. You can find a link to ACCOUNT in the upper-right corner of your screen.
- Enable Monitoring – If monitoring is not enabled, the server will always be up. If you enable monitoring, we will use a default TCP check to ensure the server is there. If you do not want to use the basic TCP check, you can select your own monitors from the table below. If there are no monitors shown in the table, you can create them under the MANAGE MONITORS sub-tab.
- Mark When Down – By default, if you check multiple monitors, our system will consider the server DOWN if any single monitor detects a failure. If you want to change this behavior so that ALL checked monitors must fail before marking the server as down, change this drop-down to “All checked monitors down”.
SERVER PORTS & PROTOCOLS
In this section you can add ports and protocols to your server. Generally, when you add public and private facing ports to your Pack, they will automatically be added here too, but not always. To add a new port/protocol combination, simply enter your port number and choose the protocol. For example, port 80 with protocol HTTP.
- Port – This needs to be a valid port number from 1 to 65535.
- Protocol – The protocol for the entered port number. Choose one of the options we support from the list. When ports are added to a server, additional options become available for them. You can REMOVE a port by clicking the black X at the far left of the row to remove a port.
- TCP Buffering – TCP buffering improves the performance by adding a speed-matching mechanism between a fast server network (like ours) and a slow client or server. Simply put, if your server replies to our cloud node quickly, but the client is slow, we’ll tell your server everything is good so it can go do something else while we slowly send the data to the client. It can only be performed for non-compressible and non-cacheable responses from the server, even when compression and caching are enabled. It is also skipped (even if you turn it on) for SSL traffic.
- Max Clients – By default, this is blank, which means we do not limit the number of clients that can connect to your server on this port. But if your server has a client connection limit, you could enter a value here to prevent our cloud nodes from sending too much traffic that might overwhelm your server, which could make it crash. The maximum value is 4294967294. When the client connection limit is reached, we will not send any more traffic to the server (on the port where the limit has been reached) until it drops below this value.
- Max Requests – By default, our cloud nodes will try to reuse connections between them and your servers to improve performance. In some cases, web servers may have issues when connections are reused for too many requests. A blank value or a 0 here means that it is set to unlimited. Only if you experience issues, should you set a limit here. Valid values are from 1 to 65535.
- Flush on Down – This feature is enabled by default. When a server goes down after failing monitoring tests, all connections will be disconnected between clients, our cloud nodes and your server. This will force those clients to reinitiate a connection. This essentially forces them to connect back again to the server(s) that remain up, or to the failover server(s), depending on your configuration. In some instances, however, when a server goes down, you may want to let the existing active connections remain connected until the clients have finished their transactions. This makes the most sense when taking a server down prior to performing maintenance, but may not be desirable for a server that has crashed.
- DDOS Policy – This allows you to choose one of the previously created DDOS policies and assign it to this port. DDOS policies are created under the DDOS Protection sub-tab, if that feature is enabled based on the account-type and package you have subscribed to.
- Status – This icon will change color based on the status of the server. Green is UP, red is DOWN and yellow indicates mixed status (some nodes see the port up, some see it down). If you hover your mouse over the icon, it will give you additional information as reported by each of the monitoring nodes used.
Load Balancers
LOAD BALANCE OVERVIEW
You must set up load balancing before you can add more than one server to your Pack. To get started simply double click the load balancing icon and enter your parameters. The “Least Connection” method and “Source IP” persistence method are the two most commonly used parameters. Please research and plan accordingly if you are not sure what methods suit you best.
LOAD BALANCE METHODS
The nodes will direct traffic toward a load-balanced server based on:
- Least Connection – Server with the least active connections.
- Round Robin – First available server. That server is then moved to the bottom of the “available servers” list.
- Least Response Time -Server with the least response time.
- URL Hash – Hash of the destination URL.
- Domain Hash – Hash of the domain URL.
- Least Bandwidth – Server with the least bandwidth constraints.
- Least Packets – Server currently receiving the fewest packets.
- LRTM – Least Response Time Using Monitors. Selects server with least monitor response time. NOTE: All servers must have monitors bound to them and must have “LRTM” enabled on the monitor.
- Source IP Destination IP Hash – Hash of the source and destination IP.
- Source IP Source Port Hash – Hash of the source IP and port.
- Call ID Hash – Hash of the Call ID in the SIP header.
For a more detailed explanation of each option, see:
Supported Load Balancing Algorithms
LOAD BALANCE PERSISTENCE TYPES
The nodes will maintain persistence and direct requests from a session to a specific server based on:
- Source IP – The source IP of the request.
- Cookie Insert – Connections with the same HTTP Cookie header.
- SSL Session – Connections with the same SSL Session ID.
- Rule – Connections that match a user-defined rule.
- URL Passive – Connections to the same URL.
- Custom Server ID – Connections with the same HTTP Host header.
- Destination IP – Connections to the same destination IP.
For a more detailed explanation of each option, see:
Supported Load Balancing Persistence Types