Home > Manual > Account Admin > Alert Lists Tab > Add Maintenance Window
Add Maintenance Window
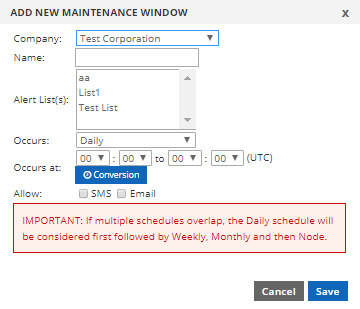
- Company: Select a company or sub-company from the drop down window that the Maintenance Window will be affect. This will determine which Alert Lists you see in the following windows.
- Name*: (*required) Choose a name for your Maintenance window and type it in here.
- Alert List(s)*: (*required) Select which Alert Lists this Maintenance Window will affect. You can select a single Alert List by clicking on it. Hold the <Ctrl> key to select additional Alert Lists if you want your Maintenance Window to affect several Alert Lists.
- Occurs: Choose how often your Maintenance Window will occur, or select Node to choose a region for your Maintenance Window. Choose between Daily, Weekly, Monthly or Node.
- Daily: This will run the Maintenance Window at the specified time every day.Select a start and end time (in UTC time zone) using the drop-down menus.
- Weekly: This will run the Maintenance Window at the specified time on the day(s) you select from the “Day(s)*” list. This Maintenance Window will repeat every week.
- Monthly: This will run the Maintenance Window at the specified time on the day(s) you select from the “Day(s)*” list on the week of the month you select from the drop-down list. It’s important to keep in mind when using this selection, that the first week of a month may not have a Sunday to Friday in it if the month starts on a Saturday. Likewise, if the month ends on a Sunday during the 5th week, that week will not contain a Monday to Saturday. For this reason, it’s always safest to choose between the 2nd, 3rd, or 4th weeks.This option is most useful if you need to run a Maintenance Window for one day every month (or several days within the same week, once a month.)
- Node: This will run the Maintenance Window at the specified time on the day(s) you select from the “Day(s)*” list on the geographical nodes you select.By default, both “Day(s)*” and “GeoZone(s)*” will have the “All” selection chosen. To choose individual Days or Geozones you first need to unselect “All”.
This option is great for suppressing alerts from Geographical regions that you aren’t concerned about monitoring from.- Time Conversion: You can use the blue clock
 beneath the drop-down lists to enter the time in your time zone. To have it run all day, you need to select 00:00 to 23:59 UTC.
This window takes a start and end time, and converts that from a Time Zone you select into UTC. Your user profile’s time zone will be automatically selected in the Time Zone field, but you can choose any Time Zone you wish from the drop-down menu. Select the start and end times from the “Occurs at” menus and when you click “Convert”, the corresponding time in UTC will be entered into the previous window.
- Time Conversion: You can use the blue clock
- Allow: You can prevent the Maintenance Window from suppressing either SMS or Email alerts by selecting the corresponding box in this field.
