
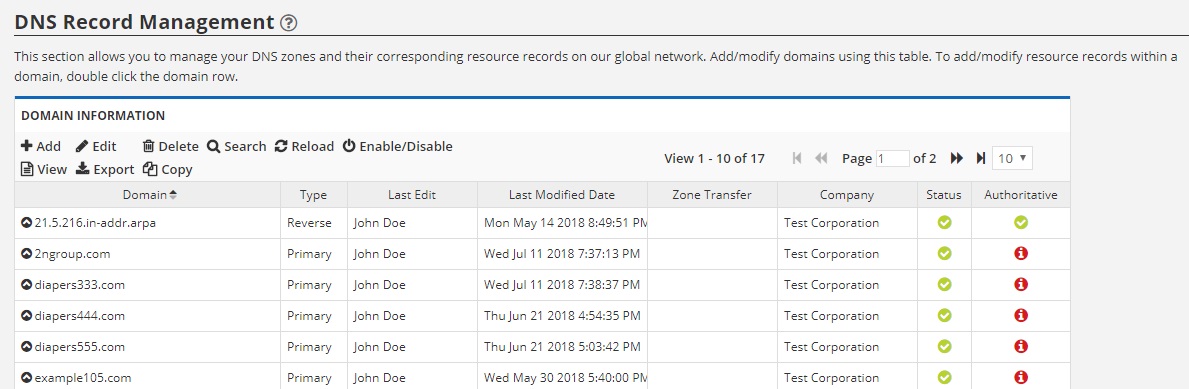
Customers who subscribe to the Cloud DNS service will see the Cloud DNS main tab and this domains sub-tab. There are four main sections as shown above:
1. Main Toolbar
The main toolbar is used to manage specific configurations and settings for the domain you have selected in the table.
2. Status Icon Legend
The status icon legend explains the different symbols you may see for any domain in the “Status” and “Authoritative” columns within the domains table.
3. Resource Record Management
Each domain can be expanded using the black arrow icon on the left. When expanded, you will see active resource records. When a domain is first created, it will have an SOA record and two NS records. Additional records are added, viewed and edited in this area (see all our supported resource record types here).
4. Name Servers
Every company is provided with a unique list of name servers for use on all domains company-wide. These name servers are part of multiple global Anycast networks and provide excellent redundancy and diversity. Additionally, we support multiple TLDs (top level domains) for additional diversity and performance.
Adding a New Domain
When you first open the Domains tab, you may not see the table displayed in the image shown above. You may simply see a button that says: “No Domains – Add a Domain”.
This means that either there are no domains in your account, or you do not have permission to see any of the domains.
To add your first domain, click the “No Domains – Add a Domain” button which will open up the add-domain dialog window as shown below. You may alternatively use the Import domain tool if you have a properly formatted copy of your zone file.
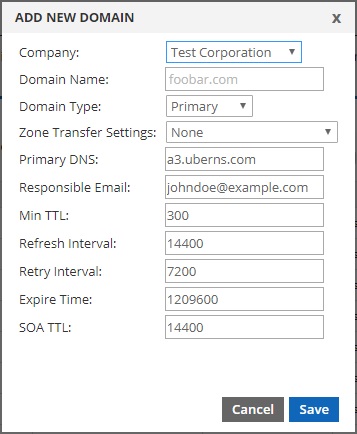
All of the fields are required for adding a new domain. The fields are as follows:
Owner Company
This select list may only show your company. But if you manage other companies, sub-companies (e.g. departments or divisions) you could create a new domain for that company without having to log into their edition of the interface.
Domain Name
Enter your apex (naked) domain name here. Such as: example.com. Do not enter www in front of it. That is an ‘A’ record you can add later.
Domain Type
The domain type options are Primary, Secondary or Reverse. A Primary domain is one that you will manage here in the Total Uptime portal such as: example.com. A Secondary domain is one that is managed elsewhere, by another DNS provider or perhaps on your own name servers that you wish to slave or replicate here on the Total Uptime platform. A Reverse domain is one for managing PTR records for IP addresses. An example of a reverse zone could be 123.123.123.in-addr.arpa.
Zone Transfer Settings
If you have already created a zone transfer pool, you can pre-select it here. Zone transfers are covered in more detail on the Zone Transfer manual page, but they allow you to enable other DNS name servers to pull (AXFR) copies of your zones so they can replicate (secondary) them.
Primary DNS
This is usually pre-populated for you with the correct name server, but should be one of the Total Uptime name servers given to you. You can see the complete list of name servers on the Domains dashboard shown at the top of this manual page in callout #4.
Responsible Email
This is the email address of the individual or group responsible for DNS within your organization. This is visible in DNS when a query is made to the SOA record, but RFC does stipulate that it should be a valid email that works.
Min TTL
This is a value in seconds (e.g. 300 seconds = 5 minutes) that is used for non-existent records. TTL stands for “Time to Live.” For example, if someone queries test.example.com but you do not have a “test” resource record (e.g. A, CNAME etc) it would return a “notexists” message back to the requesting DNS server with this TTL value. This TTL value stipulates how long a requesting DNS server can cache the notexists answer. It is generally recommended that this value be kept to a minimum, but not too low so as to increase your query volume for repetitive requests.
Refresh Interval
This is a value in seconds that tells secondary name servers (if you have them) how frequently they should manually check to see if this zone has updated. The default value is recommended. Total Uptime does not use this value for mirroring domains on our network. We use a proprietary synchronization technology.
Retry Interval
This is a value in seconds that secondary name servers will use to make additional attempts to check if a zone requires updating if the latest refresh attempt failed.
Expire Time
This is a value in seconds that a secondary name server uses to discard the zone when it has been unsuccessful in obtaining a refresh. This is used to purge stale zones from secondary servers. Unless you are planning on migrating DNS away from Total Uptime anytime soon, this should be a reasonably lengthy number equal to several days at minimum.
SOA TTL
This is a value in seconds to specifically set the TTL (Time to Live) for the SOA record itself. Unless you are planning on moving DNS away from Total Uptime anytime soon, this should be set to a reasonably high number, such as the default.
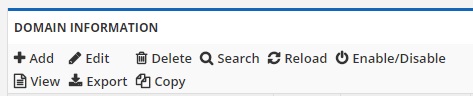
Managing Domains
Once you have added one or more domains, you can manage them by using the toolbar at the top of the domains table (grid) that is displayed, as shown below:
Add
The add button can be used to create additional domains. It will open the add domain dialog again as outlined above.
Edit
The edit button is used to change certain domain properties (not add/edit resource records). When you click the edit button you will see the following dialog:

This dialog allows you to change the company that owns the domain (or sees the domain in their portal login) for example if you had a sub-company or division/department that you wanted to give domain management capabilities to. It also allows you to attach a Zone Transfer list (ACL) to this domain so secondary name servers can pull/transfer (AXFR) the domain from the Total Uptime servers. Finally, it allows you to enter additional IP addresses (one per line) to send NOTIFYs to. For example, if you have one or more secondary DNS servers but have not listed them as NS records, you could enter their IP addresses here. NOTIFY messages are specially formatted DNS alerts that our name servers will send to those specified here telling them that the domain has been updated and that they should obtain an updated copy as soon as possible.
Delete
This button allows you to delete the entire domain or only certain record types. After you have selected a domain within the table by clicking it once, selecting the delete button will bring up a dialog box that will allow you to choose the records that you wish to delete from our system. Once records or an entire domain are deleted, it is not possible to restore them except for creating it manually or re-importing it.
Search
The search button will allow you to find a domain in our system. For example, if you have many domains where they are not easily found on one page, you can click search to open a new dialog box as shown below.
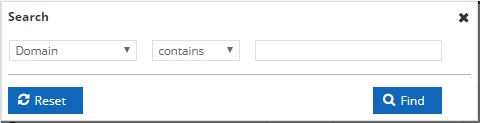
The search dialog allows you to select the column you wish to search on and to enter your own criteria. When you click the find button, it will alter the table to display only the results of your search. Additionally, a search band will appear at the top of the table below the tool bar showing that a domain search is currently in effect as shown below.
![]()
Clicking the “Clear Filter” button will remove the search filter and will return the table to displaying all of the domains you have visibility to.
Reload
This button will refresh the table with the latest update from our network. For example, if you add a new domain or make a change to the domain, the status icon may temporarily change while the change is propagating our network. The icons do not automatically update their state, so clicking the reload button will refresh them to show you the current status. It will not refresh the entire page like a browser refresh.
Enable/Disable
This button allows you to suspend the domain. Suspension removes it from our global name servers temporarily until you un-suspend it. This is handy if you want to remove the entire domain from DNS. Individual resource records can also be suspended. You must first select a domain within the table by clicking it once before you click this button.
View Records
This button will expand a domain to show all of the resource records within it. You must first select a domain in the table by clicking it once, then click this view records button. The domain will accordion expand to show the different record types that are inside. You can also view records for a domain by clicking the round black arrow icon at the far left of the row. You must use the view records button or black arrow icon to access the resource record management for a particular domain. See Resource Record Management below for further information.
Export Zones
This button will export a list of all domains within your account, as well as any sub-accounts you have. The file will be automatically downloaded via your browser, with a CSV extension. The list will contain all domains in your account(s), whether it’s a primary or secondary domain, the last user account to edit it, the sub-account it belongs to, and whether or not the domain is authoritative.
Copy Zones
This button will duplicate a zone and all of the resource records within it. You must first select a zone by clicking it once from within the table. Then click the Copy Zones button which will open a new dialog box asking for the desired name of the new domain to create. When created, the new zone will have all of the same configurations as the one that was copied.
View 1-5 of 5
In the toolbar example shown above, you will see that it shows you the number of domains you have the ability to view and that the current page is showing all 5 of them. This will differ based on the number of domains you have.
Page 1 of 1 and 10, 20, 30 select menu
In the toolbar example shown above, you will see that it is showing page 1 of 1. If you have many domains, they may be broken up into multiple pages. This is by design in order to keep the screen less cluttered. You can use the select menu (showing 30 in the tool bar example above) to change how many domains are displayed on one page. This setting is stored as a cookie in your browser so when you log in again using the same browser, it will remember your setting.
Resource Record Management
When you select a domain and click “view records” or if you click the round black arrow icon, it will expand to show all of the resource record types that already exist. An example of what you might see is shown below.
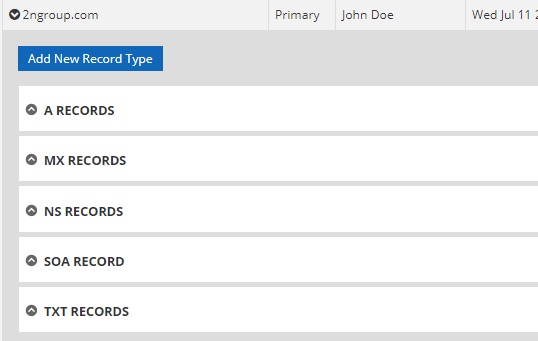
When the domain is expanded, you can add new record types and manage existing record types by clicking the black arrow icon to the far left.
In the example above, this domain already has A, MX, NS, SOA and TXT records, but your domain may not already have those. To add a record type that does not already exist, click the “Add New Record Type” button to open a new dialog box as shown below.
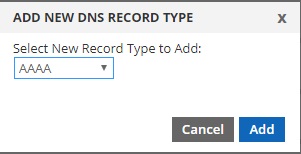
There are over 25 record types you can choose from. Only those record types that you do not already have added will show in the list, so if you do not see them in this dialog box, you probably have one of those record types already. When you select a new record type and click the “Add” button, it will immediately add it to the table, but also open a dialog box to complete adding your first record.
To see details for each record type that can be added, please view this manual page.
Viewing Existing Records
To view records you created previously, click the round black arrow icon to the far left of the record type row to expand it. For example, below is what the A Records row might look like when expanded.

The expanded resource record section will show all of the records you have created for that type. The section will also have its own toolbar (as shown above) for adding, editing, deleting, searching, reloading and enabling/disabling records. These actions perform in a similar fashion to the main domain tool bar discussed above. For example, to add a new A record, click the Add button. To edit an existing A record, select it within the table by clicking it once, and then click the Edit button. It is important to note that if you have a lot of resource records, they will be broken up into multiple pages, so if you do not see a record you are looking for, check to see how many are being shown and if there are more pages to view. You can also search for an A record if you have a long list or multiple pages. Like the main table, the status icon indicates whether the record has propagated our global record. Use the Reload button to refresh the table for the specific resource records you are viewing.
Status Icons and Legend
The status icon legend provides visual examples of the different status symbols you may see. In general the “Status” column in the main domain table (grid) should show a green check mark indicating that the record has successfully propagated our entire global network. There are occasions when this symbol shows something other than a green check mark, for example when you’ve just edited or added a new record or if you have suspended or un-suspended it. This behavior is expected.
The “Authoritative” column checks to see if the Total Uptime platform is currently configured at the domain registrar to be your DNS provider. Generally this will show a red exclamation mark when you first create a domain and until you have updated the name servers at your domain registrar with those provided (and outlined below). This icon only checks domain configurations once every 24 hours, so if you have recently set your name servers to those provided, please wait 24 hours for this icon to update to show the correct status.
To update the status of the icons to show the latest information from our network, click the Reload button on the toolbar. You do not need to refresh the entire page, in fact doing so will close all of the accordion boxes.
Name Servers
This box provides you with a list of name servers configured for your company. You may use any or all of these name servers for all of your domains. To make a domain active on our platform, you will need to configure at least 2 of these servers at your domain registrar, for example GoDaddy, Name.com, Network Solutions etc. Only when you have configured the name servers at your registrar will DNS be resolved and delivered from our platform.
When choosing name servers, we recommend using one from each column because they will resolve from different global clusters. When possible, add two that have the same TLD (top level domain) as your domain. For example, if your domain is example.com, you would benefit from using the two .com name servers in addition to other name servers. This creates redundancy but also ensures performance. Most domain registrars support up to 7 name servers, so use as many as you like. Do remember to create matching NS records for each name server you elect to use at your registrar.
For assistance or clarification on any of the above, do not hesitate to create a support case. We’re here to help you 24x7x365.