
The Import / Export tab within Cloud DNS allows you to easily bulk-add new domains to the platform, as well as export domains (currently one-by-one) in a traditional text file format for easy backup or for import into other DNS platforms.
When you first land on the Import / Export tab, you will see the following screen and options:
At the top of the page are two radio buttons which determine the options shown below. You can choose to IMPORT zones (domains) or EXPORT zones. You must first select this option, which is set to Import by default. We will cover all of the sections of the screen shown above within this document.
When the Import radio button is selected, there are three import options shown below. Internet, From Files and Copy / Paste. Each of these allows you to import new zones into the interface, but with slightly different capabilities and requirements. The default option is From Files, but we will cover each in the order they are shown.
Import: From the Internet
When the Internet radio button is selected, you will be presented with the following options:
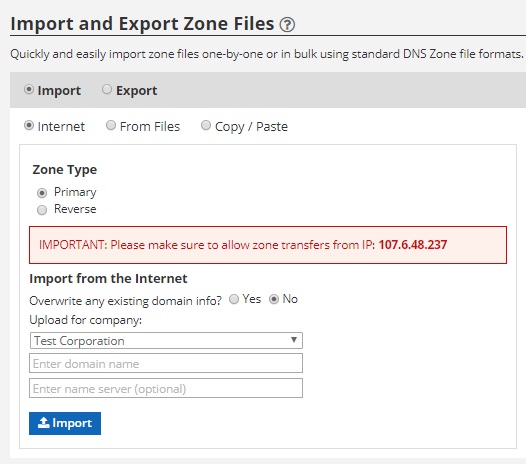
- Zone Type: The zone type is important to choose correctly because the import tool cannot detect the differences between the zone pulled via the Internet.
- Primary: A primary zone is one that will be hosted on our platform where we are authoritative and where all management is done through our web interface or API. An example of what a primary zone might look like is “example.com”.
- Secondary: A secondary zone is one that will be hosted on our platform, where we are also authoritative, but where all management is done through another DNS server or provider. In this instance, we merely copy (slave) the zone from the other provider to keep it up-to-date. A secondary zone might also look like “example.com”
- Reverse: A reverse zone is one where it is hosted on our platform and we are authoritative and where all management is done through our web interface or API. But the format of the zone is slightly different where it simply contains PTR (pointer) records (along with SOA and NS too, of course). An example of what a reverse zone might look like is “113.0.203.in-addr.arpa”.
- Overwrite any existing domain info? This option simply protects you from overwriting a zone that already exists. For example, if example.com is already in our system and you attempt to import it again, with the radio button set to NO, it will not allow you to import and will display an error. If this is intentional and you do wish to overwrite the zone, you will want to change this radio button to YES. The default setting is No.
- Upload for Company: If you are a reseller, or an organization with sub companies (e.g. for departments or divisions), you will want to select the organization to import the domain into. If you do not have any sub companies, your company is the only option here.
- Enter domain name: This is where you enter the name of the domain/zone you wish to import. For example “example.com” or for a reverse zone “113.0.203.in-addr.arpa” (without the quotation marks).
- Enter name server (optional): This is the name server that is currently authoritative or responsible for the domain that we will be pulling a copy from (AXFR). It is very important that you first enable zone transfers on that server to the IP address that is shown on the page (which may differ from the one shown in the image above) in red. This is the server that will make the request, and unless it is allowed, the zone transfer will fail. The reason this field is optional is because if it is left blank, we will simply try to zone transfer from the first NS record we find. This may or may not be the correct server to transfer from.
- Import: When you click this button, our server will attempt to transfer the domain via the Internet using AXFR. This process can take a few minutes during which time it will show “Processing…” in the results pane to the right. If it fails, it will provide an error message with further detail. If it is successful, it will provide a green “success” message.
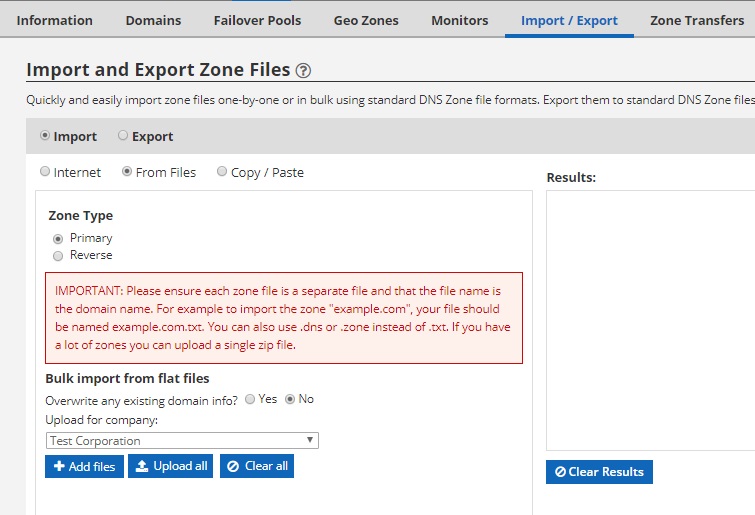
Import: From Files
When the From Files radio button is selected, you will be presented with the following options:

Importing zones from flat files is a quick and simple process, provided that your files are formatted properly. Here is an example zone that shows all of the necessary components for the file you wish to import:
@  86400  IN  SOA ns1.example123.com. hostmaster.example123.com. (
2002022401 ; serial
3H ; refresh
15 ; retry
1w ; expire
3h ; minimum
)
@    28800    NS    ns1.example123.com.
@    28800    NS    ns2.example123.com.
@    300    MX    10 mail.example123.com.
www    300    A    128.177.118.166
autodiscover    300    CNAME    www.example123.com.
As you will see, at the top it contains an SOA record (mandatory), below it contains the NS records from the DNS provider we’re importing from (which are not mandatory, and you can leave existing ones unchanged), and below that is a sample MX, A and CNAME record, each with their TTL shown. If the zone file you are attempting does not look at least similar to this, it may not import correctly. (NOTE: We have tested importing formats from all major DNS providers, so why not try it with one domain first! If you get an error, you can always delete the domain. If it works perfectly, you know it is safe to upload the rest!)
- Zone Type: The zone type is important to choose correctly because the import tool cannot detect the differences between the zone pulled via the Internet.
- Primary: A primary zone is one that will be hosted on our platform where we are authoritative and where all management is done through our web interface or API. An example of what a primary zone might look like is “example.com”.
- Secondary: A secondary zone is one that will be hosted on our platform, where we are also authoritative, but where all management is done through another DNS server or provider. In this instance, we merely copy (slave) the zone from the other provider to keep it up-to-date. A secondary zone might also look like “example.com”
- Reverse: A reverse zone is one where it is hosted on our platform and we are authoritative and where all management is done through our web interface or API. But the format of the zone is slightly different where it simply contains PTR (pointer) records (along with SOA and NS too, of course). An example of what a reverse zone might look like is “113.0.203.in-addr.arpa”.
- Upload for Company: If you are a reseller, or an organization with sub companies (e.g. for departments or divisions), you will want to select the organization to import the domain into. If you do not have any sub companies, your company is the only option here.
- Overwrite any existing domain info? This option simply protects you from overwriting a zone that already exists. For example, if example.com is already in our system and you attempt to import it again, with the radio button set to NO, it will not allow you to import and will display an error. If this is intentional and you do wish to overwrite the zone, you will want to change this radio button to YES. The default setting is No.
- Select Files: This button will open a pop-up window to allow you to select files from your local hard drive for import. It is important to note that files should be named appropriately. For example, to import the domain “example.com”, your file should be named “example.com.txt”. (We also support .dns and .zone instead of .txt.) If you have a lot of zones to import, you can select multiple files, or you can put them all into one .zip file too.
- Upload: This button, as shown above, will not appear until you’ve selected at least one file. Clicking it will start the upload process. As each file in the list is processed, it will show a green check mark. You will also see a status listing in the results pane on the right. If everything imports successfully, you will see a green entry in the results pane for each domain. If a domain cannot be imported, or is imported with errors, it will show error detail in red. The results pane will try to provide further information about the zone, for example, it may indicate there was an error importing a CNAME record. Occasionally a zone does have syntax errors, and in such an event, you can compare the imported zone to the file to find the differences.
- Clear List: Use this button to remove all of the files from the list if you have incorrectly selected files that you do not wish to import.
Import: From Copy/Paste
When the Copy/Paste radio button is selected, you will be presented with the following options:
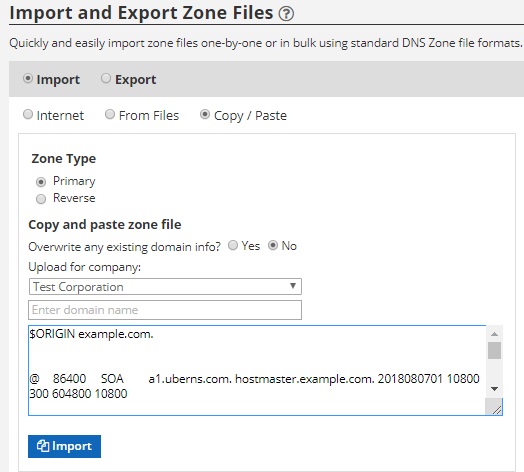
Importing zones using copy/paste is quite similar to the import from file procedure, with the exception that the import tool can only import one domain at a time.
The format for the zone should be identical to the example shown above for the Import from files. Additionally, the Zone Type, Overwrite, Domain name and other settings are also identical.
Simply type your domain name into the field (e.g. “example.com”, without the quotes), then copy and paste the zone contents into the large box and click the Import button.
You will see the results of the import on the right-hand results pane. If the import is successful, you will see a green success message. If it fails, completely or partially, further detail will be provided in the results pane.
Exporting a Zone
When you select the Export radio button, you will be presented with the following options:
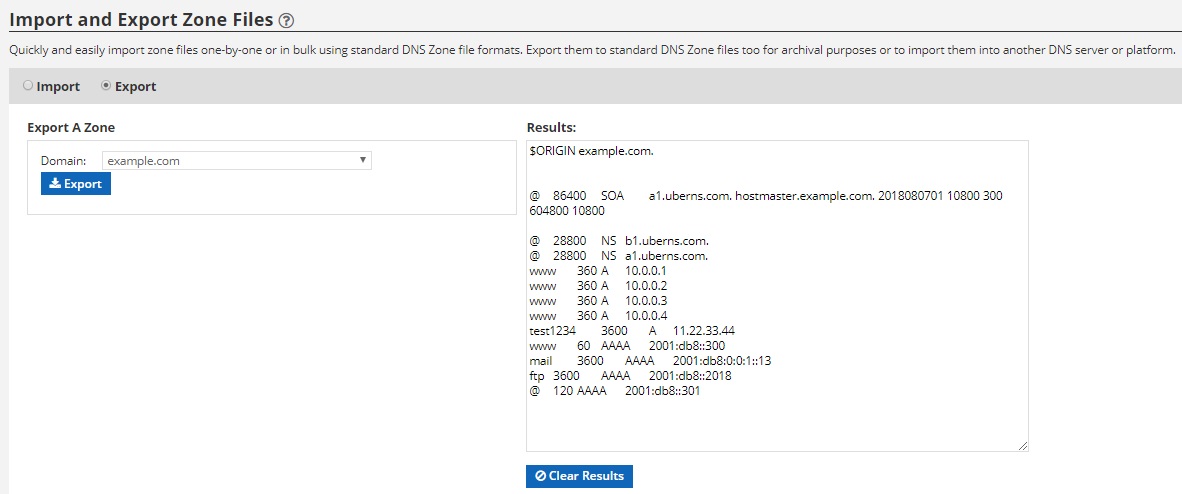
The export process is fairly straightforward. Simply select the domain you wish to export from the select menu. If the domain contains Geozone information (not applicable if you do not use our GEO DNS feature), then options will show in the second select menu. Otherwise, the second select menu will remain empty.
Simply click the EXPORT button and within a few seconds, the content of your zone will appear in the results pane to the right. This information is properly formatted and can be copied directly into a text file for further editing or saving. It can also be imported back into the Cloud DNS interface using either the From Files or Copy/Paste method.
We do not yet have a feature to export all of your zones. This feature is on our road map and will become available soon. We will update this manual when available.