Home > Manual > Account Admin > Users Tab
Users Tab
Not interested in reading the manual? We cover the essentials in a video at the bottom of this page!
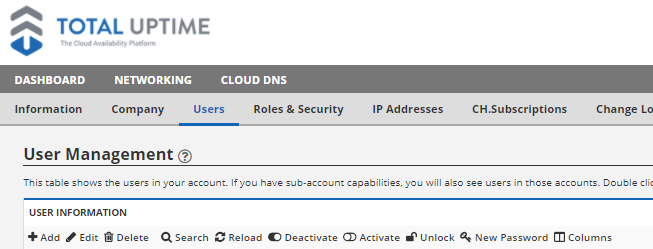
This section displays a list of users for all of the companies you have access to view. You can add new users by clicking the ‘add’ button, or edit them to update contact information, change their active/inactive status or change which role the user is assigned to. If you are a reseller, you can create and manage users for your sub-companies as well.


- Add: You can add a user by clicking on the “Add” button.
- Edit: You can edit a pre-existing user by selecting their name and clicking the “Edit” button.
- Delete: Select a user and then press the “Delete” button if you wish to delete a user. This action cannot be reversed, so whenever possible we recommend deactivating a user’s account.
- Search: Search for a User account.
- Clear Filter: You can press the Clear Filter button at any time to clear your search filter and display all users.

- Clear Filter: You can press the Clear Filter button at any time to clear your search filter and display all users.
- Reload: Refreshes the current screen.
- View: Allows you to see the users information without the ability to edit it. This option will be present if the user has read only permissions for User Management.
- Deactivate: Select the user account and press “Deactivate” to suspend a User Account. If the user is currently logged in, they will be immediately logged out and they will not be able to log back in again unless the account is reactivated.
- Activate: Select the user account and press “Activate” to reactivate a User Account. This will restore a user account’s ability to log in.
- Unlock: If a user unsuccessfully tries to log in to their account 5 times in a row within 15 seconds, their account will become locked. This is designed to prevent brute force login attempts. It will automatically unlock itself within 5 minutes, however if you wish to unlock the account sooner you can select the locked account and press “Unlock”.
- New Password: Select the desired User account and press “New Password” to generate a new password to replace the previous password with. *A password must contain 8 – 32 characters, Lowercase letter, Uppercase letter, Numeric character, Special character.

You can also set your security question and answer that can be used to send a copy of the user’s password to the email account listed as the User Name if they ever forget it and need a reminder. To save a change in this window, click the “Save” button below the appropriate section. - Columns: Press the “Columns” button to change which columns you’d like displayed in the Users table.
