DNS Failover Pools

Failover Pools are lists of one or more IP addresses (IPv4 or IPv6) that can be assigned to A or AAAA records to automate record changes based on certain monitoring criteria you specify. For example, you may have a failover pool that contains the IP addresses 1.1.1.1 and 2.2.2.2 representing two web servers. You can specify a monitor for each IP address to determine if they are available or not. If one or more IP addresses become unavailable as determined by the monitor, the A or AAAA record will automatically be changed to remove the non-functioning server.
CREATE A FAILOVER POOL
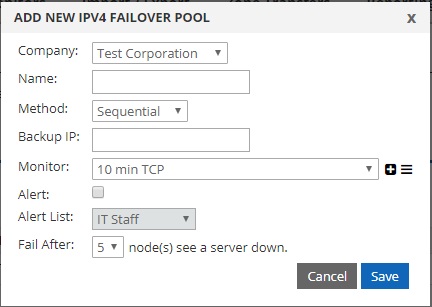
To create a Failover Pool, click the Add button at the top of the IP Failover Pool Table. This will open a dialog box where you can specify the initial settings for the pool:

- Company: Choose the sub-company you wish to create the failover pool for.
- Name: Choose any name you wish to reference this pool.
- Method: Two methods are supported but only take effect if you have more than one IP address in your failover pool. Roundrobin will send all active IP addresses but deliver them in random order for each record lookup request. This is often used as a rudimentary way of evenly distributing traffic among many servers. Sequential will only send one IP address for the record based on the priority specified. For example, an IP address with a priority of 1 would be sent before a priority of 2, but only if that record is active and its status is UP.
- Backup IP: If all of the IPs in your failover pool become unresponsive, your failover pool will default to this IP address. This can be a backup server, a “Site temporarily down” page, or even one of the servers listed in your failover pool.
- Monitor: This allows you to specify the default monitoring method for the pool entries. For example, you may wish to ping each IP address to determine if that device is available. You also have the ability to specify a unique monitor for each entry within the entry edit dialog itself.
- Alerts Enabled: This checkbox will enable email/SMS alerting for UP/DOWN changes for the entries within the pool.
- Alert List: This is the list that alerts are sent to. You can create lists and add/remove members from within the Account settings area.
- Failover After: This is the number of nodes that must agree with a device’s UP/DOWN status before a pool entry’s active/inactive status is changed. The recommended setting is 2. This will only activate/deactivate an IP Address entry if two of the Cloud Monitoring Datacenters see the same status.
ADD FAILOVER POOL ENTRIES
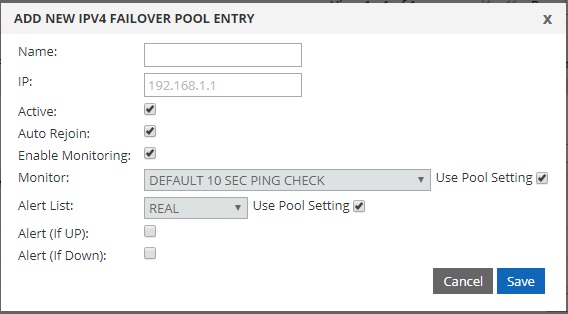
Once a Failover Pool has been created, click the arrow icon to the left of the pool name to expand it. Inside you will see a sub-table where you can create individual entries or IP Addresses. Click the Add button on the sub-table header to make a new entry. A dialog box will pop up with the following fields:

- Name: This can be any name you choose to help you reference the device
- IP: This is the IP address of the device
- Priority: (Only visible on edit) This determines the order the IP addresses will be used IF your failover is using sequential mode. It does not impact roundrobin mode since all available IPs are used then.
- Active: This indicates whether or not you want this device to be actively used
- Auto Rejoin: After an IP address fails a monitoring check it will become inactive. Should it resume successful monitor checks, enabling this setting will automatically bring it back into use. If you do NOT want the IP to be utilized again (perhaps because you need to synchronize a back-end database, for example) then you may not want auto rejoin enabled.
- Enable Monitoring: This enables monitoring and uses the monitor type you specify below, or inherit from the pool. If you disable monitoring for an IP address, the system will assume it is always available. This may be desired for your highest priority (least used) pool entry due to the fact that if all IP addresses in a pool fail to monitor, the ‘A’ or ‘AAAA’ record it is assigned to will be completely withdrawn from DNS potentially creating undesired results.
- Monitor: This is where you can specify a separate monitor for this device. The default is to use the Pool Monitor that was chosen when the pool was created.
- Alert List: This is where you can specify which alerting list to use when this device changes UP/DOWN status. The default is to use the Pool Alert list that was chosen (if applicable) when the pool was created.
- Alert if UP: This checkbox allows you to receive an email/SMS to the alert list when this device changes to UP status.
- Alert if Down: This checkbox allows you to receive an email/SMS to the alert list when this device changes to DOWN status.
USING A FAILOVER POOL
Once you have created a Failover Pool and have assigned one or more IP Address entries to it that are successfully monitored and showing a status of UP, you can then create an A or AAAA record and assign the pool to it. To do this, go to the Domains tab and click on the Domain name you would like to assign it to. Expand it by clicking the arrow icon at the left of the row and then expand the A or AAAA Records sub-table. If it does not exist yet, you will need to add a new record type by clicking the Add New Record Type button.
Within the A or AAAA Records, click the Addbutton on the sub-table header or edit an existing record. The edit dialog box will pop-up so you can make changes to the record. Within it, you will see a Failover drop-down menu. The menu will display your available failover pools. Making a selection here will override any IP address specified in the IP Address field above, so there is no need to delete it. Simply click Submit for it to take effect. Within a minute or two, your record will reflect the IP address(es) specified in the Failover Pool.
IMPORTANT: Before you Submit the change, be sure that your TTL value is set to a low value, for example 60 seconds. Otherwise, should a server change from UP to DOWN, you want to be sure that it will expire quickly in any cache entries around the world. A long TTL may impact your ability to fail over quickly.