
Total Uptime offers an array of granular connection rate limiting options to protect almost any application type. Our advanced rate limit options can protect you at layer 7 to ensure your applications are always available to legitimate users. Best of all, it can be customized on a per-port basis.
Rate limiting is available for ADC-as-a-Service and the sub-services of it including Global Server Load Balancing (GSLB), Cloud Load Balancing and Web Application and API Protection. We make it extremely easy to implement it in the management panel or API within a matter of seconds. This feature was added in the 21.3.0 release.
Why use connection rate limiting?
Sometimes you simply need to limit the number of connections a user can make to a resource. There are a number of reasons, but some of the most common ones are:
- To maintain app availability and performance
- To ensure fair resource utilization and prevent server overload
- As a defense strategy to mitigate DoS or DDoS
- To slow or stop web-scraping or vulnerability scanning
- To mitigate brute-force credential stuffing & cracking
There are many good reasons to use rate limiting on your application. Perhaps you have a few of your own.
How rate limiting works
Rate limiting is typically based on the source IP address of the user, machine or bot making the request. For the most part, this is a reliable way of determining who a “user” is. Limiting the number of connections based on the IP is a quick and easy way to go and can protect any application in a hurry.
But filtering on the IP alone is not necessarily the perfect solution in every scenario. For example, some larger ISPs place hundreds or even thousands of users behind a single IP address using technology such as CGNAT (carrier-grade NAT). When filtering on source IP address exclusively, this can incorrectly limit traffic. To get around this, other rate limiting parameters are often added, such as the URL being requested.
Limits based on time
At Total Uptime, our rate limiting methods work to restrict the number of connections an IP (and destination URL combo, if desired) can make within a certain window of time. This is our most popular limiting function and works exceedingly well to protect standard web applications such as APIs and websites.
But rate limiting often needs a fudge factor. In our case, we offer rate limits in two different flavors, “flexible” and “fixed”. A flexible type of rate-limit would allow a user to consume all of the available connections quickly (e.g. all in the same second) where a fixed rate-limit would prohibit this.
For example, consider loading a web page. You may have 30 objects on it including the html, CSS, JavaScript, images etc. If you deploy a rate limit that limits 60 connections per minute in a flexible mode, the user could load all of those 30 objects right away, and then another 30 objects too at any point within that one-minute period. This is often desirable, especially for this web page example.
But if the rate-limit were fixed, the same user could only load one object every second, making the 30-object web page take 30 seconds to load. As you can see, this would be undesirable for a website, but maybe it is exactly what you need for an API. It all depends on your specific requirements, so keep those in mind.
More than just source IP limiting
Another option we provide is to consider the destination URL in addition to the source IP. This helps combat the CGNAT issue by considering what page or URL the user is requesting in conjunction with the IP. Of course, if everyone behind the same IP targets the home page at the same time, this doesn’t help, but if users are on different pages it works extremely well.
Furthermore, considering the URL in addition to the IP is a great strategy to protect assets such as a login page. With the URL as part of the equation, you can often reduce the rate limiting threshold too, providing even more protection where it might be needed most.
What happens when the limits are reached?
In all cases, our rate limiting typically drops traffic by default. Other providers prefer to send an HTTP response (at least for web apps) such as a 429 (Too Many Requests) by default, but that’s not always the best decision especially when considering that most of the time rate limiting is used to prevent malicious activity. Dropping the request often makes the attacker wait for the connection attempt to timeout, thus slowing them down too.
How to implement connection rate limiting
To get there, you’ll first need to click on the edit button beside the port you wish to apply rate-limiting to.

Once you choose the port you want to apply the settings to as shown above, you’ll see the following dialog where you’ll see the rate limit options at the very bottom below the country blocking feature. You might need to scroll if you don’t see them right away.
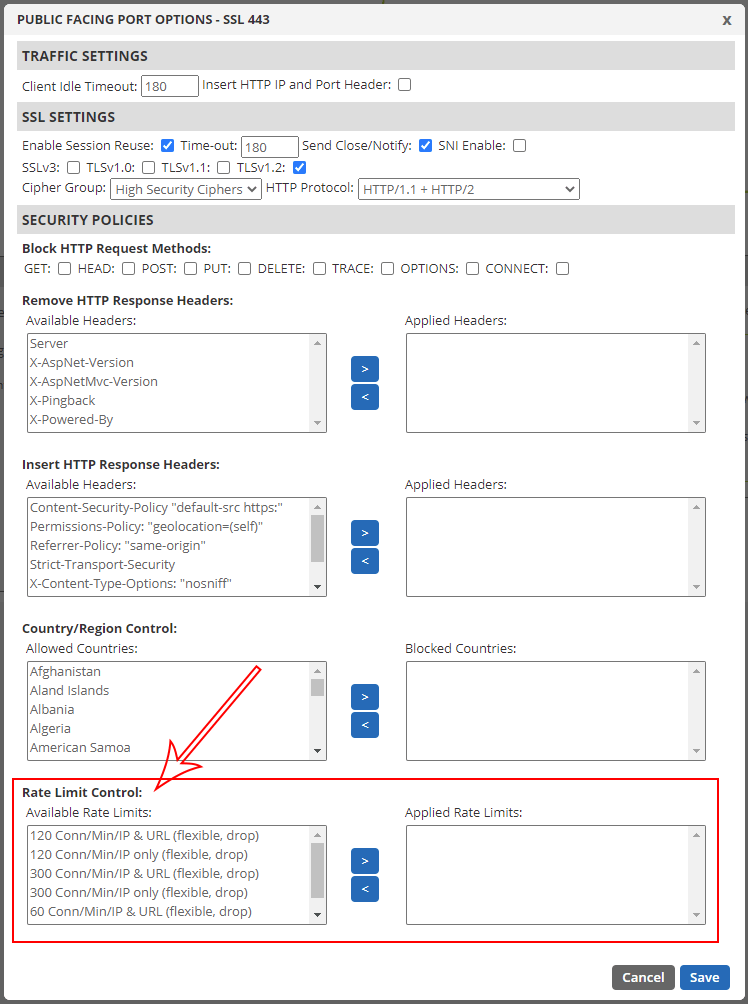
Many rate limiting options
Here you will see that there are a number of options to choose from. Of course, the “flexible” vs. “fixed” options we mentioned earlier, but we also list options that include just the IP address, or both the IP and destination URL. For web applications or APIs, we strongly recommend starting with the more granular “IP & URL” rate limit option since it will be less restrictive.
To enable one of the limiter options, simply choose the one that best suits your application and move it to the right side so it can be applied. If you need to apply more than one, you can do that too, but be careful!
Once you have made your selections, click the “save” button and give it a few minutes to take effect. If you watch the top of the browser, the yellow deployment indicator will show you when it is complete and ready to test.
And don’t forget that each port will allow you to choose a different limit. So you an differentiate between traffic destined for HTTP/80 from that going to SSL/443.
A word of caution. Test.
That’s right, one word: “Test”. If you are a rate limiting expert, you’ll probably already know which limiter you want for each application. But even if you are an expert, we highly recommend testing thoroughly. After applying a rate limit rule (and waiting for it to deploy), test your website or application to ensure it still gives the expected behavior. Like our example above describing flexible vs. fixed, you don’t want any unintended consequences.
And as every good QA tester knows, try many different scenarios if you can. Don’t just assume the way you use your application is the way everyone does. Think of different things a client might do and test those scenarios as well.
You might be surprised that you need to relax (increase) the rate limit threshold a little bit. When in doubt, start with a high limit and work your way down until you see issues. Once you do encounter an issue as a result of the limiter, back it up to the last known good configuration.
In Conclusion
Even though our rate limiting functions can be extremely effective and were designed to work well for most common scenarios, it’s important to always consider if a more granular server-side or client-side strategy might be needed too. Having a first line-of-defense at the network edge is ideal to knock out the vast majority of traffic, but going granular can have many benefits too!
For example, if you do prefer sending a custom HTTP response code that we don’t support, you may wish to enable that within your application. Or if you want to lock-out a user account after too many failed login attempts, that’s something that needs to be implemented within the application too.