
The ADC-as-a-Service fully supports WebSockets. WebSocket support is configurable in both the public facing and back-end device settings dialogs. You will need to enable it in both locations for it to pass through to your device(s) correctly.
Skip on down where we provide screenshots of exactly where you can find these settings in the panel.
What is a WebSocket?
Basically, a WebSocket is a bidirectional communications protocol that allows continuous communications between a client/user and a device/server. It’s an evolution of HTTP, if you will. Where HTTP has to go through a specific series of request/response in order to receive every single object needed, a WebSocket opens a communications channel that stays open until one side disconnects.
WebSockets are used in real-time web applications where timely information needs to be sent from the server to the client. Normal HTTP can’t do that. With HTTP (and SSL or TLS – HTTPS), all requests must be initiated by the client. The server can only respond to the client.
Useful application of WebSockets might include real-time status updates for a website, such as up/down indicators like we use in our own Total Uptime panel. It would be silly for you to have to refresh the page to see the status when we can simply push the latest change to the page as it happens. Not only does that reduce the burden on the user, but it makes for a more responsive UI and an overall better experience.
Other examples include stock tickers, gaming or chat applications, just to name a few you might be familiar with. You’d be surprised how many things across the web use some for of WebSockets. If you open up developer tools in your browser and look through the connections, if you spot ws:// or wss:// then you know that’s a WebSocket connection.
Enabling WebSockets in the Total Uptime Panel
WebSockets aren’t enabled by default since they aren’t required for every type of web application. But if you do need to enable it, here you’ll find the settings. Of course, it is only configurable if you’re using the SSL protocol on our platform.
That doesn’t mean it won’t work with just TCP, for example, but it means you’d configure it on your device since TCP is just a passthrough protocol whereas HTTP and SSL are layer-7 optimized and allow you to configure many other functions in our panel.
Finding the WebSocket Setting in the Public Facing Port Options
Below the Edge cloud icon in the configuration builder you’ll see your ports. Click the icon shown in the screenshot below to open up the public facing port options dialog. It’s a tiny button you might have missed before, but there are a lot of features hiding there.

In there, you’ll see a drop-down that defaults to HTTP/1.1 + HTTP/2 support. But if you pull the menu down, you’ll see that WebSockets is an option as well. Choose it and click the blue save button at the bottom of the dialog.

Finding the WebSocket Setting in the Device Port Options
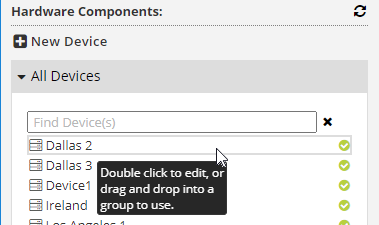
To see the settings within a device, expand the “All Devices” section on the left navigation of the configuration builder and double click it. This will open up the dialog.
Then go to the Ports and Protocols sub-tab to see the Back-End SSL settings. Of course this will only show up if you have added the SSL protocol, typically with port 443. The concept is the same, it defaults to HTTP/1.1 + HTTP/2 support, but if you pull the menu down you can enable WebSockets as well.

Once you have both of those settings enabled, allow a couple of minutes for the change to propagate the network. Watch the yellow banner at the to know when the change is complete. You should then be ready to test!
Of course, if you encounter any issues, we’re happy to help! Just reach out to our support team.
And if you want to learn more, check out this Wikipedia WebSocket article. Yeah, it’s Wikipedia, but it gives a lot more color.