How do I extract the SSL certificate from Microsoft IIS so it can be imported into the interface and used in Cloud Load Balancing?
There are a few steps involved to successfully export SSL certificates from Microsoft IIS. Essentially, it needs to be exported, run through openssl to separate the key from the cert and split into two files. The two files can then be loaded into the interface. If you already have a key and cert file because you use a Linux/UNIX based web server like Apache, this is not for you. You already have what you need.
STEP 1: First, you need to extract the certificate from your windows server. This is a fairly simple process if you follow these steps:
-
RDP to your server
-
On the Start menu, click RUN and then type MMC. Hit enter.
-
In MMC, click FILE > ADD/REMOVE Snap-in.
-
Click CERTIFICATES > Add.
-
Select the COMPUTER ACCOUNT and then click Next. Select Local Computer and then click Finish. Then close the add standalone snap-in window and the add/remove snap-in window.
-
Click the + sign to expand the certificates (local computer) console tree and look for the personal directory/folder. Expand the certificates folder.
-
Right-click on the certificate you want to export and select ALL TASKS > Export
-
Choose YES, EXPORT THE PRIVATE KEY and include all certificates in the certificate path if possible. WARNING: Do not select the delete private key option.
-
Leave the default settings and then enter your password, if desired.
-
Choose to save the file and then click FINISH. You should receive an “export successful” message. The .pfx file is now saved to the location you selected.
-
Move this file to your desktop for the next step, unless you’re okay with installing openssl on your server (does not require a reboot).
STEP 2: Since you’re using IIS, we’ll also assume your desktop is Windows. So you’ll need to install the openssl tool on your machine. If by chance you use Linux as a desktop, you probably already have openssl installed. Or, if you have a Linux machine handy, you can skip this step and do this there.
To get open SSL, you will need to download it from this link:
http://slproweb.com/products/Win32OpenSSL.html
When at that site, if you scroll down, you’ll see quite a number of options. You’ll probably want Win32 if you’re on a 32 bit machine or the Win64 version if you are on a 64 bit machine (e.g. Windows 10).
Go ahead and download, run the installer and remember where you installed it. Default answers to the questions are just fine.
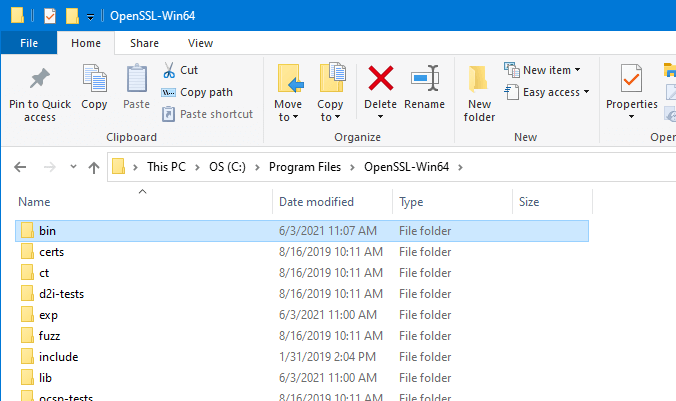
STEP 3: Ok, now that you have the handy openssl tool installed, we can break the cert apart. First, open the directory where openssl was installed. In my case, I installed it here:

Go one step further and open the bin directory. Now take your .pfx file and put it there in the bin directory.
Now open a Command Prompt and change to that directory by typing: cd c:\openssl-win64\bin or whatever it is to get into that bin directory.
If you run a “dir” you should see your .pfx file in there, along with the few other files.
Ok, now run this command to create a text file that contains the key and cert.
Openssl pkcs12 –in my-cert-name.pfx –out outputfile.txt –nodes
Note: change “my-cert-name.pfx” to the name of your actual .pfx file.
If you exported your cert from IIS with a password, it will ask you to enter it.
This process will have created a file in your bin directory called outputfile.txt. Go ahead and open that file with your favorite text editor, like notepad. Sometimes notepad line-wraps the entire thing into a big mess, so notepad++ or wordpad often makes it look better.
Inside the file you will see a bunch of text at the top starting with Bag Attributes. Same in the middle. What you need to extract is the stuff between —–BEGIN PRIVATE KEY—– and —–END PRIVATE KEY—– (including the begin and end lines). Put the PRIVATE KEY information into a separate text file and save it as yourdomain-key.pem
Now do the same to extract the certificate part. Grab everything from (and including) —–BEGIN CERTIFICATE—– all the way to (and including) —–END CERTIFICATE—– and put it in a separate text file called yourdomain-cert.pem.
Now you can discard this outputfile.text if you want, but just in case, hang onto it until you know everything is good, otherwise you’ll have to run the whole extraction process over again.
IMPORTANT: Before you go ahead and upload the certificate information to the cloud load balancer, it is a good idea to run the KEY through openssl one more time to ensure that there are no hidden space control characters in it. While that doesn’t happen all the time, it happens frequently enough that it makes sense to do this now while your command prompt is still open.
So assuming you’ve put the yourdomain-key.pem into the openssl bin directory, run this command against it:
Openssl rsa –in yourdomain-key.pem –out yourdomain-key2.pem
Once complete, delete the prior key file so you’re left with just the key2 that we just created. That’s the one that has been cleaned.
Okay, that’s all. So easy, right? Now you’re ready to upload the certificate and key (and then pair them, and maybe link them to an intermediate certificate) in the SSL tab of the user interface.