How do I create a DKIM (Domain Key) record?
Yahoo originally created Domain Keys as an authentication and validation technique for email using a PGP-like protocol. The original specification has since been improved to DKIM (DomainKeys Identified Mail) by the community and a series of IETF standards resulted in RFC 6376.
DKIM makes it very easy for a mail server to validate whether an inbound email message is from the domain it says it is from, and whether or not the message has been altered. This is critically important because we all know how easy it is for anyone to send an email from someone@example.com. DKIM provides a mechanism for mail servers to validate quickly and easily.
So how does it work? Simply put, you create a public and private key. You install the private key on the mail server and publish the public key in DNS, so receiving mail servers can retrieve it on demand. When your mail server sends a message, it grabs the body and portions of the header and uses the private key to create a signature which is then placed into the message header. This allows the receiving mail server to verify the signature using the public key to ensure the message was not spoofed or altered.
Deploying DKIM
Deploying DKIM is not a difficult process. First, it requires that you have a mail server that supports this functionality. If you do not control your own mail server (e.g. you use Gmail, hosted mail by GoDaddy etc.) then you may need an upgrade. But most of our clients reading this post operate their own mail server, like Exchange, for example, and have the ability to implement.
We won’t cover how to deploy it for any specific mail server, but we will outline the 6 general steps that need to be completed.
Step 1: Determine your selector. This is simply a name you wish to give your key. In our example here, we’ll simply use “mail”. Note that the selector does not have to correspond to your mail server name, e.g. mail.example.com, you can call it “key1” if you want.
Step 2: Use the handy tool at EasyDMARC or DMARCLY to create a key. Enter your domain name in the first box (e.g. example.com) and your selector in the second box (e.g. mail, as we discussed above). Choose the size of the key (bigger is more secure, although bigger is also slightly slower) and click create keys.
Step 3: After clicking the button, you will see a public and a private key generated. Copy the entire private key starting with —–BEGIN RSA PRIVATE KEY—– and ending with —–END RSA PRIVATE KEY—–. Paste this into a text file and save it because you’ll need to put this on your mail server in step 6.
Step 4: Scroll down further to see the selector record example in the dashed blue box. Copy everything you see there starting with k+rsa all the way to the end just inside the “ symbol, often ending with QAB. For example, we created a record for the domain example.com with the selector of mail, and we have copied this:
k=rsa\; p=MIIBIjANBgkqhkiG9w0BAQEFAAOCAQ8AMIIBCgKCAQEAwEqgyHD2mtg6iN6B7Xiv4ebjuRLPqQHmoWSRfFaG61N+QbRIEGZgprLPlQDlfDErntp/g1rT7o6Sk+MQoLHZeAmftn3yzZLcgGuCf+gz3JWYvP0xUk9Kvpz9KBz/tGHlHrnKvTx8aKQ8GS6T2uLICleq6RShhhFYqvJ1CkQMgcD6Smet6e2sdYSS0w8oxbD1AsQKbIa5ub8UG3stFmrASoUzWP0+uF1OwruPAGw13nfGcMzRdWSC0NT8wq8SQaYSYBv1gYsRZc+iuWEWgV6MSJpcbAi+0F5Czaw2tLE4TyngHk36zxrTfSPq6XOM/RgDFIaMSkigq8kSCv+c+Aq+nwIDAQAB
You do NOT want the quotation marks at the beginning or the end.
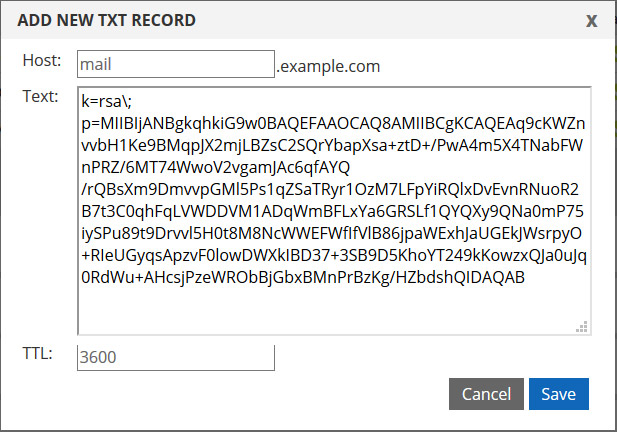
Step 5: Log into the DNS portal, expand your domain, and create a new TXT record and enter the contents. The hostname is your selector and the text is the public key. For our test domain of example.com with a selector of mail, it looks like this:

Step 6: The last step is to enable signing on your mail server. Every mail server is different, but it generally involves placing the private key file onto the server, enabling signing and referencing that key. It shouldn’t be overly complex, but every mail server is different.
That’s about it! As you can see, from a DNS perspective, it really isn’t that complex. Here are links to a couple resources that we’ve referenced in our article.
Resources: