
NOTE: This article covers obtaining the original client IP for logging purposes. If you need to obtain it for use in your code, check out this article.
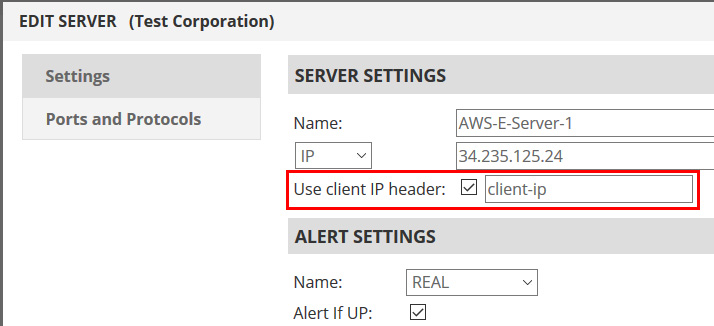
IMPORTANT! Before implementing the steps below, we’ll assume you’ve enabled the “client-ip” header pass-through. To do so, log into the management portal and edit your server(s). In the settings dialog you will see the “Use Client IP header” option. Enable it and then specify a header name. “client-ip” is our recommendation, but it can be most anything you desire. In our examples, we will use “client-ip”.
Extracting the Client IP for use in log files and the Application:
In order to extract the client-ip header and use that information, on the server-side, server specific plug-in modules must be written or the CGI scripts have to be modified to use the client-ip header.
You can download our sample ISAPI Filter for IIS 4.0, 5.0 and 6.0 here. It contains the following files:
clientip.c – The main ISAPI filter Code
clientip.def – Definition File
Makefile – VC++ Makefile
clientip.dll – Client IP Filter module built for IIS.
Steps for installing the Client IP Filter:
Start the IIS Manager
- Copy the clientip.dll to the server’s document directory and make sure that the directory has the executable permission (e.g. if you copy the clientip.dll to the /inetpub/wwwroot/cgi-bin directory, it should have the appropriate executable permission)
- Go to the web server properties
- Click on the ISAPI Filter tab and then click Add. This brings up the Filter Properties form.
- Enter the Filter Name as “client-ip” and in the Executable name, provide the full path to the clientip.dll file. Click OK to close the filter properties. To confirm the filter, go to the ISAPI Filter tab, click Apply and OK to quit from the ISAPI Filters tab.
- To check the Client IP Filter status, go to the ISAPI Filter tab again and this time it should list the Client IP filter and the status should be loaded (a green up arrow means the filter is loaded.)
- Enable Web logging
- Send test web traffic through the Cloud Load Balancer to the server.
- Check the log file in the server. It should have the real Client IP information in the log entries instead of the Cloud Node IP.
The clientip.c can be changed to customize the filter. Refer to VC++ ISAPI programming for adjusting the filter.
IIS has the ISAPI (IIS APIs) interface for its server modules in a different level. IIS can notify the plugin during the following phases of a request processing:
- Raw Data
- Pre-processing Header
- Authentication
- URL map
- Log Level
The plugin can be written and registered with IIS if you would like to perform operations on one of these levels. The filter must specify the NOTIFICATION level and the function to a callback. IIS will callback this function for every request processing before moving to the specified processing level. For example, if you wish to log the “client-ip” information in the web logs, then a filter can be written at ‘Log Level Notification’ and registered. IIS invokes the filter before logging the Web Transaction. Now, the filter can extract the “client-ip” header value using GetServerVariable() call and write the “client-ip” header values in the client address field of the logging data structure.
On Notify Log Event,
// This code assumes that the header name is configured as “client-ip”
if (!pfc->GetServerVariable( pfc, "HTTP_CLIENT_IP", achHeaderValue, &cbHeader ) )
{
     if (ERROR_INVALID_INDEX != GetLastError())
          return SF_STATUS_REQ_ERROR;
}
strcpy( (CHAR *)pvData->pszClientHostName, achHeaderValue );
To uninstall, simply remove the files listed above.
Disclaimer: These software applications are provided to you as is with no representations, warranties or conditions of any kind. You may use and distribute it at your own risk. Total Uptime disclaims all warranties whatsoever, express, implied, written, oral or statutory, including without limitation warranties of merchantability, fitness for a particular purpose, title and noninfringement. Without limiting the generality of the foregoing, you acknowledge and agree that (a) the software application may exhibit errors, design flaws or other problems, possibly resulting in loss of data or damage to property; (b) it may not be possible to make the software application fully functional; and (c) Total Uptime may, without notice or liability to you, cease to make available the current version and/or any future versions of the software application. In no event should the code be used to support ultra-hazardous activities, including but not limited to life support or blasting activities. NEITHER TOTAL UPTIME NOR ITS AFFILIATES OR AGENTS WILL BE LIABLE, UNDER BREACH OF CONTRACT OR ANY OTHER THEORY OF LIABILITY, FOR ANY DAMAGES WHATSOEVER ARISING FROM THE USE OF THE SOFTWARE APPLICATION, INCLUDING WITHOUT LIMITATION DIRECT, SPECIAL, INCIDENTAL, PUNITIVE, CONSEQUENTIAL OR OTHER DAMAGES, EVEN IF ADVISED OF THE POSSIBILITY OF SUCH DAMAGES. You agree to indemnify and defend Total Uptime against any and all claims arising from your use, modification or distribution of the code.