
In our v3.10 release, we introduced a new Cloud Load Balancer feature called Overflow. This feature is designed to send traffic from your active server group to your failover server group when a certain connection threshold has been reached. This threshold can be configured globally to count connections being distributed to all of your servers, or individually for each server in the event the devices are not equal in size or capacity.
There are a number of use cases for this feature, but a common one we’ve heard often was that occasional bursts of traffic would overwhelm the servers in the primary server group. Rather than letting them get overwhelmed and slowing down service for everyone, the burst traffic should be sent elsewhere to either: A) let the backup server(s) handle the excess traffic, B) give them a maintenance/sorry/queue page, or C) reject their connections entirely so they will try again later or go away altogether.
There is only one prerequisite to enabling this feature. You must have one Failover Group. When you configure the first failover group in your load balancing config, you’ll see a new option to the right that says Overflow, as shown below.
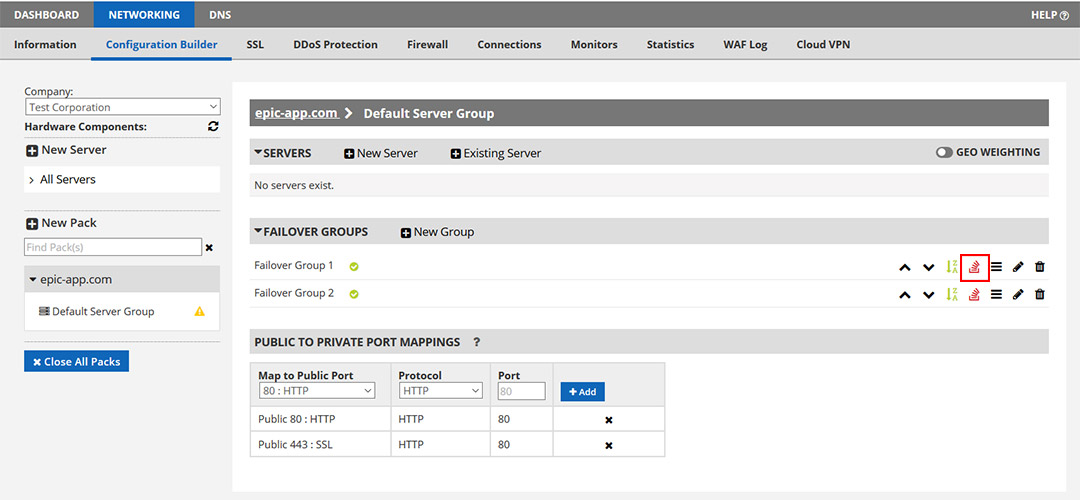
To enable the feature (or change the settings or disable it too), click the link circled in red as shown above. This will open up a new dialog window like this one:
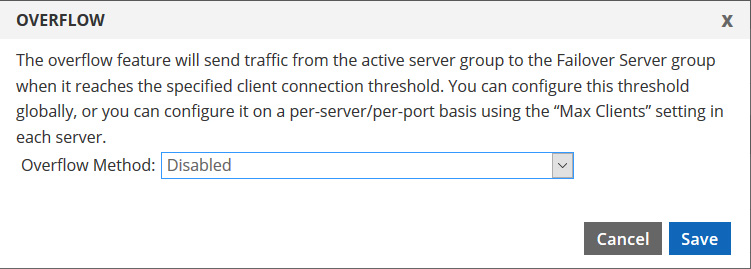
By default, if the overflow was not previously enabled, it is disabled by default as shown above. In this case you must choose one of the two options shown in order to configure the feature:
- Enabled with global max-clients threshold
- Enabled with per-server/port max-clients threshold
Enabled with global max-clients threshold
When you choose this method, it allows you to configure a global connection count (global max-clients) that is considered for all of the servers in your primary server group. When the number of active connections being load balanced/distributed to all of your active servers reaches this threshold, traffic will be sent to your failover group… the failover group that you’ve clicked and enabled the overflow feature on.
There are a couple of things to keep in mind when using this global setting. A) If a server goes down, which effectively removes it from the load balancer, the remaining server(s) will receive more traffic because the global max-clients applies to all of them. If this would create a problem, you may wish to consider the other per-server/port method instead. B) Likewise, if you add more servers to the primary server group, you may need to increase this number. However, despite these potential concerns, this is the easiest overflow method to configure.
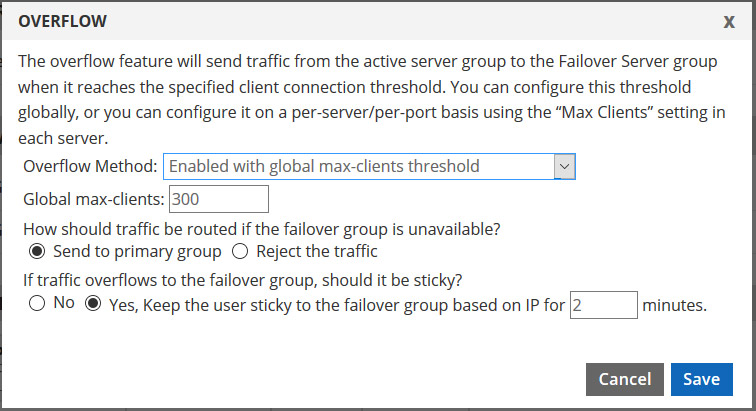
In addition to the Global max-clients setting, which requires a number between 1 and 4,000,000,000, there are two other options that must be configured as well.
- How should traffic be routed if the failover group is unavailable. The two options are to “Send to primary group” and “Reject the traffic”. If you choose Send to primary group, traffic will be distributed to your primary server group as if the global max-clients value was an infinite number. Of course, this only happens when the failover group is down, and the failover group can only be down if all of the devices in it are down. If you choose Reject the traffic, a TCP Reset will be sent to the client.
- If traffic overflows to the failover group, should it be sticky? The two options are NO and YES. If you choose yes, then you must specify the number of minutes. This is essentially source-ip based persistence. This is a safeguard for situations where you want to ensure that if a client is directed to the failover group in an overflow situation, they stay on the server they are directed to until their session expires. An example where this is usually essential would be an e-commerce site where the user would otherwise lose their shopping cart or have their checkout process disrupted if they were suddenly sent to the primary group should the connection count fall below the threshold.
Once you have made your settings and click Save & Close, the changes take effect within two minutes.
Enabled with per-server/port max-clients threshold
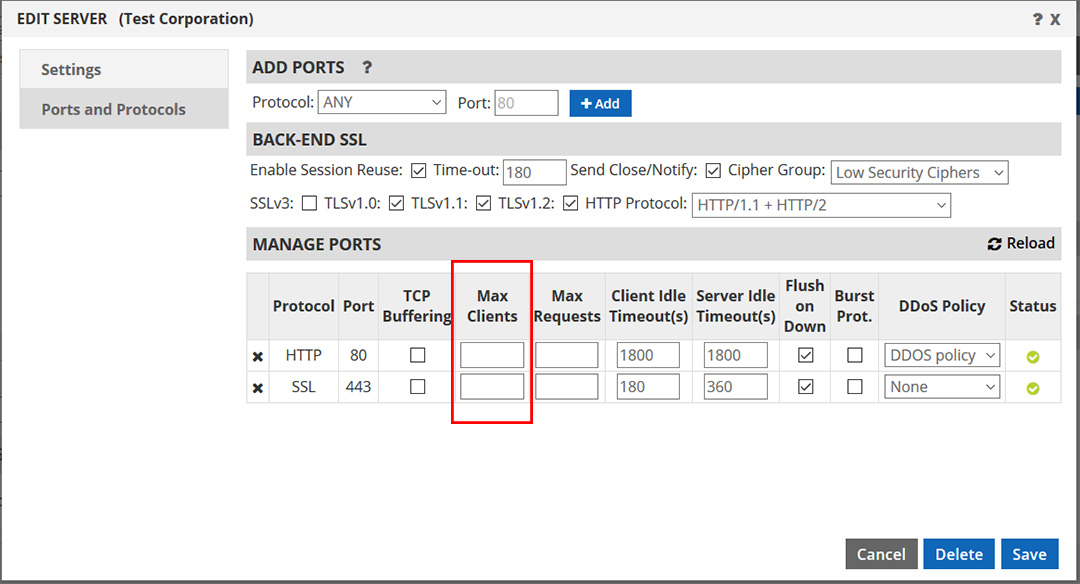
When you choose this method, it allows you to configure a connection threshold per server by populating the “Max Clients” setting for each port in each server in your primary server group. IMPORTANT: You must configure this value before you enable this feature, otherwise you will not be allowed to save your settings.
Below is a sample of the server dialog box where you would configure the Max Client value. You would expand the “All Servers” pane on the left side of the configuration builder and double click your server(s) to access this window.
Once you have configured the Max Clients value, you will be allowed to save (enable) the Overflow feature.
Just like the settings required when you use the global max-clients option, there are two other items that must be configured as well before you can save.
- How should traffic be routed if the failover group is unavailable. The two options are to “Send to primary group” and “Reject the traffic”. If you choose Send to primary group, traffic will be distributed to your primary server group as if the global max-clients value was an infinite number. Of course, this only happens when the failover group is down, and the failover group can only be down if all of the devices in it are down. If you choose Reject the traffic, a TCP Reset will be sent to the client.
- If traffic overflows to the failover group, should it be sticky? The two options are NO and YES. If you choose yes, then you must specify the number of minutes. This is essentially source-ip based persistence. This is a safeguard for situations where you want to ensure that if a client is directed to the failover group in an overflow situation, they stay on the server they are directed to until their session expires. An example where this is usually essential would be an e-commerce site where the user would otherwise lose their shopping cart or have their checkout process disrupted if they were suddenly sent to the primary group should the connection count fall below the threshold.
Once you have made your settings and click Save & Close, the changes take effect within two minutes.
Disabling the Overflow Feature
If you wish to disable the Overflow feature at any time, simply click the “Overflow” link again to open this dialog box. It may say “Overflow ON” or “Overflow OFF”, it really doesn’t matter. When you click it, the configuration options are presented so you can modify them or choose “Disabled” from the drop-down menu and save & close to turn the feature off.
Final note: Some customers have asked us what happens if you fill out all the Max Client values before turning on the overflow feature. The answer to that question is that when the max clients threshold is reached for an individual server/port, connections are sent to other servers in that group. If the cumulative total is reached for all servers, then connections are queued until one of the servers has capacity to accept the connection. This may be acceptable to you, or you may wish to set the Max Clients value to a much higher number until you have completed your overflow configuration. Then you can go back to each server and adjust the max clients to a lower number.