Extracting the Client IP in Apache 2.0 and 2.2
NOTE: This article covers obtaining the original client IP for logging purposes. If you need to obtain it for use in your code, check out this article.
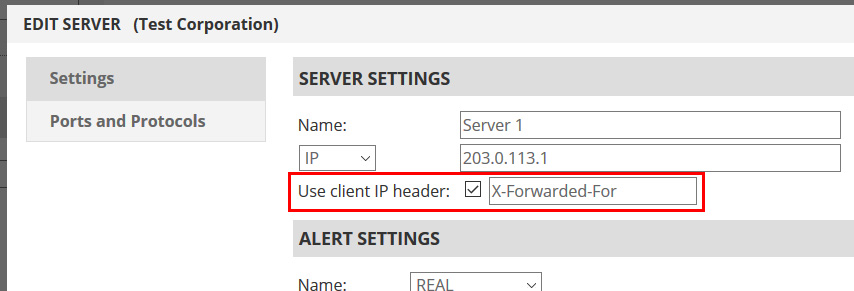
NOTE: Before implementing the steps below, we’ll assume you’ve enabled the “X-Forwarded-For” header pass-through. To do so, log into the management portal and edit your server(s). In the settings dialog you will see the “Use Client IP header” option. Enable it and then specify a header name. “X-Forwarded-For” is our recommendation, but some web servers allow you to use anything you desire. In our examples, we will use “X-Forwarded-For”.
Configuring the Apache Web Server to Log the Client IP Address Sent in the Custom HTTP Header:
To configure the Apache Web server to capture the client IP address from the header strictly for the Apache log files, complete the following procedure.
- Open the /opt/apache2/conf/httpd.conf file in a text editor, such as vi NOTE: The path to the httpd.conf file might vary depending on the configuration of the server. It is mostly available either in the <Apache_Install_Location>/conf/ or the /etc/ directory. Additionally, ensure that you make a backup of the configuration file before making any changes to it!
- Append the following entries to the file:
LogFormat "%{X-Forwarded-For}i %l %u %t \"%r\" %>s %b \"%{Referer}i\"\"%{User-Agent}i\"" cloud-access CustomLog <Lof_File_Path>/<Log_File_Name> cloud-accessNOTE: If the preceding entries already exist in the configuration file, simply make the necessary changes to the entry. These entries change the parameters for an existing log file. However, if you add the preceding entries to the configuration file, then a log file is created to log the client IP address with the specified parameters. - Save and close the configuration file
- Run the following command to restart the HTTP daemon: # /opt/apache2/bin/httpd –k restart
- Repeat this procedure on each Apache server in the farm.
Configuring the Apache Web Server to See the Client IP Address Sent in the Custom HTTP Header for use in your application:
If you need the IP address of the client for more than just the web server logs, e.g. for authentication, security or tracking, complete the following procedure:
- Download the Apache source archive from the Apache HTTP Server Project website.
- Save the file in the /tmp directory
- Run the following command to extract the content of the package archive:
#tar -zxvf /tmp/httpd-2.0.55.tar.gz (or different file name if updated)
NOTE: Use the -zxvf option in the preceding command only for the tar.gz package. For the bz2 package, use the -jxvf options. - Navigate to the directory containing the Apache source, such as /tmp/httpd-2.0.55.
- Run the following commands to install Apache:
# ./configure -prefix=/opt/apache2 -enable-so
# make
# make install
NOTE: In the preceding command the -prefix is optional. This option ensures that Apache is installed in a custom directory. - Download the mod_custom_header.c module here to the Apache server and extract the .c file from the zip folder.
- Change to the directory where you have saved the mod_custom_header.c module
- Run the following command to compile the module as a dynamic shared object (DSO):# /opt/apache2/bin/apxs -c -i -a mod_custom_header.c
- Open the /opt/apache2/conf/httpd.conf file in a text editor, such as vi.
- Append the following entries to the file:MEForder refuse,accept
MEFrefuse all
MEFaccept xx.xx.xx.xx xx.xx.xx.xx xx.xx.xx.xx xx.xx.xx.xx xx.xx.xx.xx
MEFCustomHeader X-Forwarded-For
NOTE: The MEFaccept line should contain a list of our Cloud IP node addresses you will see, separated by a space. Contact support for an up-to-date list. We do not list them here for security purposes, but more importantly because we will add you to our mailing list to receive updates for when we add new cloud nodes! - Save and close the configuration file.
- Run the following command to restart the HTTP daemon:# /opt/apache2/bin/httpd -k restart
- Repeat this procedure on each Apache server in the farm.
- Run the following command to verify that the Apache access logs display the IP address available in the custom HTTP header as the source IP address for the request:# tail /opt/apache2/logs/access_logThe IP address at the beginning of the entry should be that of the client, not a cloud node.
SECURITY NOTE:This module causes Apache to implicitly trust the value available in the custom HTTP header. A security risk arises because the HTTP headers can be easily spoofed. This enables an attacker to purposefully modify the contents of the custom header to specify an IP address of choice. This allows the attacker to hide the actual IP address from the log files of the Apache server. Because of this we recommend two things:
- Obtain the current list of IP addresses for the MEFaccept entry. Do not set this to “all”. Do not remove the MEFrefuse all entry.
- Consider changing the custom header value of “X-Forwarded-For” to something obscure, e.g. “cust0m-h3ad3r-n@m3” instead of the example shown