DNS domains (called “zones”) can be moved from any platform to Total Uptime’s DNS platform easily and without impact to end users. In this article, we will outline the steps required to ensure a smooth, zero-impact migration.
There are 4 simple steps…
Here are the steps required to migrate zones from your current DNS provider/infrastructure to ours. Total Uptime will assist all customers with this to make it as easy as possible, ensuring zero-impact to end users. If you need our help, just reach out to us!
1. Choose a Freeze Period
Before you copy zones from the current DNS provider or system, you’ll want to choose a “Freeze Period” for DNS. While this is not essential, it is highly recommended. The Freeze Period can be any length of time you choose (generally one or two days) where you will not make any changes to your DNS records. This is important, because at the beginning of the Freeze Period, you will copy (not move) your zones from the current platform to ours so you can begin to review them and familiarize yourself with how to make changes to your records. So, choose any day you want for your freeze period. Weekends are often the best time for most organizations.
2. Copy the Zones from the Old Platform and Import to the New
On the first day of your freeze period, copy (emphasis on copy, not move) your zones from the current DNS platform to the new one. Many organizations, such as GoDaddy, DNSmadeeasy, Dyn and others, simplify the process by giving you access to handy zone export tools. Sadly, some providers, like Network Solutions, do not. Systems like BIND or Microsoft DNS also make it easy… not necessarily with an export function, but they make it easy enough to grab the zone files from the system.If you can retrieve the zone files from your current provider or system:Now that you have a copy of your zones, be sure that each zone file is named to match the zone. For example, if your domain is example.com, that particular zone file should be named example.com.txt or example.com.dns or example.com.zone (these are common extensions for many export tools and other DNS systems, so we support them all). If you have a large number of zone files, put them into a single Zip file to make importing easier and quicker. But make sure that you separate your primary, secondary and reverse zones into separate zip files. We can’t import them all at once right now.Now that you have your zones named and zipped (if applicable), go to the IMPORT/EXPORT tab in the cloud DNS portal and click the IMPORT radio button. Then choose “From Files”. Select the record type of your first batch or zip file (primary, secondary, reverse), click the SELECT FILES button and find the files (or zip) from your computer. When uploaded to the queue window, click the UPLOAD button that will appear.
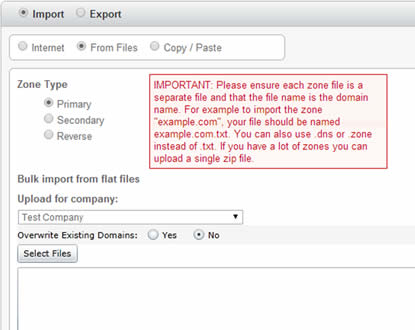
Figure 1: The Import dialog
As the domains upload, you will see the results in the results pane on the right. When completed, go to the DOMAINS tab to review and/or correct any errors that were shown. You will see all of your domains in the table. You can click the black arrow icon to the left of each domain to expand and show the records. For each record type, you can click the black arrow at the right to view the records. Keep in mind, there may be multiple pages within each record type if you have a lot of records. Make sure everything looks like it should.
If you are unable to export the zone files… e.g. Network Solutions
Some providers, as we mentioned earlier, don’t have a handy export function. In this case, you’ll have to manually key in your domains. Total Uptime can complete this process for you if you are comfortable providing your credentials to us. Otherwise, follow these steps to migrate your domains.
- Go to the DOMAINS tab.
- Click +ADD from the toolbar.
- Enter your domain name, email address and click save. All other boxes can be left at their default recommended values.
- Now expand the domain in the table by clicking the black arrow at the left
- Click the ADD NEW RECORD TYPE button and choose the one you wish to create records for. For example, ‘A’ records.
- Now create individual records for each entry in your existing DNS portal, ensuring they are entered identically to what you see there.
- When it comes to MX records, some providers do not show a HOSTNAME box like we do. Enter the @ symbol to create an MX record for the root/apex of your domain (which is what most organizations need).
- Repeat all of the above for all record types. If you need help, just give us a call!
3. Verify your domains have imported correctly
Now that your domains have been successfully imported (or if there errors, you still need to do this), go to the DOMAINS tab. There you will see a listing of them. You can expand each domain to view the records within, and expand each record category to view the records. Make sure that everything looks good and corresponds with what you remember each domain having. Be sure to check your MX records too.You should also spot check your domains using an external tool to ensure our name servers are answering them. While this isn’t required, it’s good practice, just to be sure. To do this, visit our testing tool at http://tools.totaluptime.com. At the top of the tools page you will see our NSLOOKUP tool as shown below in figure 2. Enter the record you want to test in the domain field (e.g. www.example.com, mail.example.com etc.) and then enter one of our name servers in the server field (provided to you on the DOMAINS tab in the portal.) Click GO and look for the results. If everything is correct, you’ll see an ANSWER RECORDS section on the following page showing what you queried and the resulting IP address. The other sections like Authority and Additional records can be ignored.
Figure 2: The NSLookup test toolOnce you have completed a few spot checks to be sure that things are generally okay (you certainly don’t need to check every record, just a few), you’re ready to move onto the next step.
4. Change the Name Servers at the Registrar
Now that you’ve imported, reviewed and spot checked your zones and are happy with the way things look, you’re ready to switch over! Simply go to your registrar and change the name servers from the current ones to the new ones listed below. Within 48 hours (but generally less) all DNS queries will come to the new platform and stop going to the old one. During this 48 hour period you should refrain from making changes (another reason for the freeze period).Here are a few links to common domain registrars and how to change name servers:
GoDaddy: https://ca.godaddy.com/help/edit-my-domain-nameservers-664 Select the 2nd option “Setting Custom Nameservers for a domain registered with us”
Network Solutions: https://www.networksolutions.com/manage-it/edit-nameservers.jsp
Name.com: https://www.name.com/support/articles/205934547-changing-nameservers-for-dns-management
That’s it – You’re Done! Now you can abandon your zones on the old platform and simply make changes to them on the new one moving forward. Purge them from the old one in due course, but leaving them there won’t affect anything since the old name servers are no longer authoritative. If you have an account at the old provider that has a fee associated with it, it would be safe to close it after 72 hours.
Frequently Asked Questions
What are the new Name Servers I should use?
We have several name servers you can use. Please log into the DNS management portal and click on CLOUD DNS and then the DOMAINS sub-tab. Once you add your first domain, you will see a listing of assigned servers on the lower-right side of the screen.
How does this migration process eliminate downtime?
During the period following the change of your name servers from the current ones to the new ones at your registrar, both the old DNS platform and the new DNS platform will have identical copies of your zones. This means that in the event a user is directed to the old one even after you’ve made the change to the new one, the old platform will still answer authoritatively with the correct DNS information because it’s still there. Generally, within 48 hours (but often less), queries will stop hitting the old platform at which point it is safe to delete the domains from there.
What if I have to make changes during the freeze period or right after I change the name servers at my domain Registrar?
Generally, you should avoid this at all costs, hence our suggestion for a planned freeze period. But if you must, make the changes on both platforms to ensure that in the event a user is directed to the old platform, they will still receive the right DNS response to their query. But be aware, not all other DNS providers allow this. Network Solutions, for example, will disable your access to the DNS Zone information once you change the name servers to ours! In that case, you’ll just need to wait 24 hours, or go ahead and make the change/update on our platform, but understand that a fraction of people on the Internet may not see that change/update for 24 hours.
If you have any questions about the process, please do not hesitate to contact us. We’re here to help make the process smooth for all of our customers. The best method to reach us is by creating a ticket at http://support.totaluptime.com. You can also call us using one of the numbers at the very top of this page.